Lec 9 继承和面向对象编程
上节课我们引入了class关键字,它并不是严格需要的,但却是一种强大的组织工具,为我们提供了一些巧妙的方法 将我们的自定义类型集成到 Python 中,以便它们可以使用内置的 运算符和函数。
这节课我们进一步通过几个运用类功能特性,来展示类的组织工具的强大。
继承
我们关于属性查找的规则不仅涉及在实例及其类中查找,还可能涉及在其他类中查找(具体来说,如果我们正在处理的类有超类的话,会查找该类的超类)。但是到目前为止,我们还没有在我们的环境图中展示过任何这种关系。
回顾一下,我们上一节提到,变量查找,属性查找。
IMPORTANT
要查找一个变量:
- 先查找当前帧
- 如果未找到,在父帧中查找
- 如果未找到,查找那个帧的父帧(继续跟随该过程,在父帧中查找)
- 如果未找到,查找全局帧如果未找到,
- 查找内置变量(诸如 print、len 等的绑定)
- 如果未找到,引发 NameError
我们在这里引入的是一个另外的东西,我们称之为属性查找。这个概念是我们已经找到一个对象,而不是在帧内查找一个变量,我们想要在该对象内部查找一些内容。这个过程略有不同进行:
- 首先查找对象本身
- 如果未找到,则查找该对象的类
- 如果未找到,则查找该类的超类
- 如果未找到,则查找该超类的超类
- 如果未找到且没有更多的超类,则引发 AttributeError。
但是到目前为止,我们还没有在我们的环境图中展示过任何这种关系,也没有讨论过这种关系对我们的代码的实际影响,更没有谈到在设计程序时如何利用这种关系。
x = "dog"
class A:
  x = "cat"
class B(A):
  pass
b = B()
print(b.x)这个例子,我们保持A的定义不变, 但是我们定义了B,B后面括号A,表示B时A的子类。但Python看到新定义的B类后,创建B类对象,并且引用父类。通过这种方式,在A定义而在B类没有定义的属性,也能被B类所访问,我们说B继承了A的属性和方法。
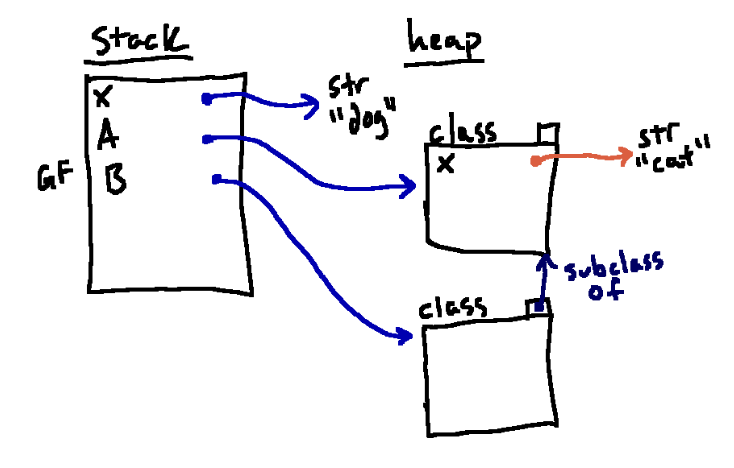
当我们执行到b=B()时候,环境图如图
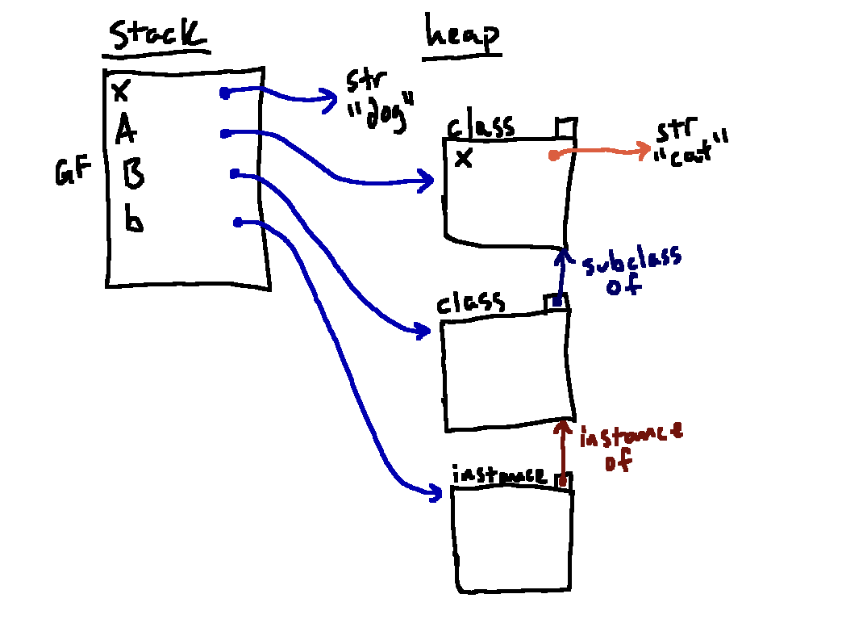
当我们求解b.x时候,Python首先通过名称b找到我们的实例,然后从实例中找名x的属性。没有找到,就顺着箭头找到B指向的对象,我们也没找到,进而找到类A,我们找到了"cat"
几个例子
class A:
    x = "apple"

class B(A):
    x = "banana"

    def __init__(self) -> None:
        self.x = "potato"
b = B()
print(b.x)答案:
potato
需要记住的是,当我们实例化一个类是,Python回去找名字为__init__函数来初始化实力,并且遵循“属性查找”原则,当他找到后,会隐式调用。看下面这个例子。
class A:
    x = "apple"

class B(A):
    x = "banana"

    def __init__(self):
        self.x = "potato"

class C(B):
    x = "peach"
c = C()
print(c.x)答案
potato
但我们使用
class A:
    x = "apple"

class B(A):
    x = "banana"

    def __init__(self):
        self.x = "potato"

class C(B):
    x = "peach"
    def __init__(self):
      pass
c = C()
print(c.x)答案
peach
案例:绘图库
虽然我们学习几个例子感受继承背后的一些原理,这些知识对学好Python很重要,但是我们还没了解何时以及为什么要用这些特性在我们代码上。那下面我们就通过案例来更好地说明,我们应该如何通过这些特性来组织我们的代码,从而为管理大型程序的复杂度打下基础
需求
基本信息
这个案例需求是实现一个绘图库,实现绘制复杂形状的功能。
在本节最后提供了一个代码框架。如果你感兴趣的话,可以在你电脑上跑。该代码顶部附近的一些辅助函数,但我们的关注点不在上面,而是关于对形状的表示和绘图实现。我们定义形状的方式是像素。
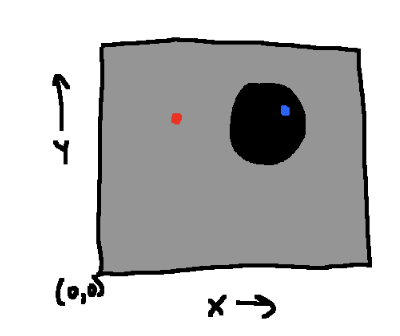
相对原点坐标(0, 0)在左下角,x和y都是向上增长
一个像素位置是(x, y),如何判断这个形状的一部分吗?
- 答: 蓝色点像素是形状的一部分,而红色点则不是
我们准备用类代表形状。实现上述功能,我们需要用到特殊的魔法方法__contains__,它是用来实现自定义类型in关键字功能的,(x, y) in s会被解释称s.__contains__((x, y))
- 任何图形的中央像素值是什么?
- 我们用s.center来表示(x, y)
- 如何实现绘制图形
- 给形状类
s定义额外的方法s.draw(im, color),其中im是实验2的格式,color是(r, g, b)元组
- 给形状类
class Shape:
  """
  代表2维形状
  __contain__(self, p) 返回true如果点p在形状内
    ”(x, y) in s“ 在shape的实例中会被自动转成s.__contain__((x, y))

  s.center 返回形状的中心点(x ,y)

  draw(self, image, color)

  """

  def __contains__(self, p):
    pass
  def draw(self, image):
pass形状、圆和矩形类定义
开始实现两种形状: 圆和长方形,我们可以通过继承Shape实现
class Circle(Shape):
  pass
class Rectangle(Shape):
pass圆的实现
存储什么信息才能代表一个圆/长方形
我们如何用这些信息实现__contains__,center和draw?
class Circle(Shape):
  def __init__(self, center, radius):
    self.center = center
    self.raidus = radius

class Rectangle(Shape):
	def __init__(self, lower_left, width, height):
    self.low_left = lower_left
    self.width = width
self.height = height下一步我们思考怎么实现__contains。 一个可能的起点是考虑到Circle和Rectangle都是Shape的子类,它们都会继承Shape类中的__contains_ _方法。因此,我们可以在Shape类中填充__contains__方法的定义,同时保持Circle和Rectangle类不变, 类似
class Shape:

  def __contains__(self, p):
    if isinstance(self, Circle):
      # 基于圆和半径计算
    if isinstance(self, Rectangle):
      # 基于圆和半径计算
  def draw(self, image):
    pass

class Circle(Shape):
  def __init__(self, center, radius):
    self.center = center
    self.raidus = radius

class Rectangle(Shape):
	def __init__(self, lower_left, width, height):
    self.low_left = lower_left
    self.width = width
self.height = height值得一提的是,这种结构是可行的,即从技术上讲,可以通过这种方式实现.但是我们会建议避免这种代码(特别是显式类型检查的代码),主要有几个原因。
主要原因是要考虑到未来可能会扩展我们的库,不仅仅包含圆形和矩形。目前,如果我们考虑添加一种新形状,那么我们需要在多个地方修改代码(需要创建一个新类并确保其设置了正确的属性,但随后我们还需要跳到Shape类中,在__contains__方法中添加新的条件,并确保这两个地方是一致的!)。不仅如此,如果我们不断添加形状,这个v方法会变得非常庞大和复杂,这会成为一个容易出现错误的地方。
我们希望添加新形状的过程更加简便,即所有与特定形状相关的内容都存在于一个地方(在子类中)。所以,组织上我们要实现的是:
- 只有对所有形状通用的内容才定义在Shape类中,
- 而特定形状的所有内容都定义在该形状的子类中
尽管有这个目标,但我们确实需要一种方法来区分这些行为。不过,我们将利用在这篇和上一篇阅读中学到的规则,避免编写显式类型检查代码。
class Shape:

  def __contains__(self, p):
    raise NotImplementedError("Subclass of Shape didn't define __contains__")
  def draw(self, image):
    pass

class Circle(Shape):
  def __init__(self, center, radius):
    self.center = center
    self.raidus = radius
  def __contains__(self, p):
    # todo: 基于圆做计算
    assert isinstance(p, tuple) and len(p) == 2
    return sum(i-j) ** 2 for i, j in zip(self.center, p) <= self.raiius ** 2

class Rectangle(Shape):
	def __init__(self, lower_left, width, height):
    self.low_left = lower_left
    self.width = width
    self.height = height
  def __contains__(self, p):
    # todo: 基于矩形做计算
    px, py = p
    llx, lly = self.lower_left
    return {
      llx <= px <= llx+self.width
      and lly <= py <= lly+self.height
}通过这种方法,Python隐式地为我们进行类型检查,而不是显式地进行,这样可以保持我们的代码更清晰、更模块化(这将使理解、测试、调试和扩展程序变得更容易!)。
draw方法实现
本节我们会再介绍一种组织方式,首先,让我们尝试以与__contains__相同的方式组织代码,即在每个子类中实现draw方法。
class Circle(Shape):
  #...
  def draw(self, image, color):
    for x in range(image['width']):
      for y in range(image['height']):
        if(x, y) in self:
          set_pixel(image, x, y, color)


class Rectangle(Shape):
  #...
  def draw(self, image, color):
    for x in range(image['width']):
      for y in range(image['height']):
        if(x, y) in self:
          set_pixel(image, x, y, color)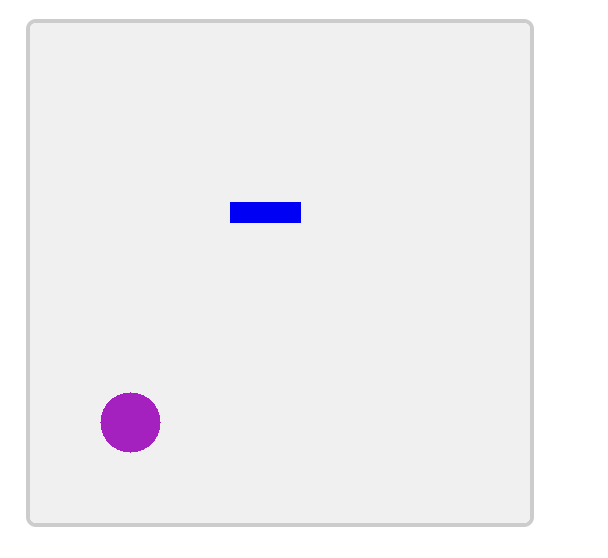
这些函数是完全相同的!通常情况下,像这样复制复杂的代码只会让你的代码更容易出现错误;它们给了错误很多藏身之处,并且使得当出现问题时更难找到并修复这些错误。
但更重要的是,现在实现的draw方法是完全通用的。它不仅适用于正方形或矩形,而且适用于任何能够执行包含检查(通过__contains__方法)的形状。
class Shape:

  def __contains__(self, p):
    raise NotImplementedError("Subclass of Shape didn't define __contains__")
  def draw(self, image, color):
    for x in range(image['width']):
      for y in range(image['height']):
        if(x, y) in self:
set_pixel(image, x, y, color)完成这个步骤后,任何时候在Shape类的任何子类中寻找draw方法时,我们都找不到draw方法,但会沿着链条向上查找到Shape类,在那里我们会找到这个方法。
可能有些地方看起来有点奇怪,即我们在Shape类中定义了draw方法,但在draw方法内部却调用了一个__contains__方法。那么我们会不会得到之前在Shape.__contains__中引发的NotImplementedError呢?
事实证明这会完全正常!通常情况下,调用draw方法的方式是通过Circle或Square等形状的实例。因此,在draw方法内部,self指的是这些子类的实例之一。因此,当我查找self.__contains__时,Python会找到适合我们调用draw方法的形状类型的正确__contains__方法。这一点起初可能会感到有些奇怪,但这种将通用代码移到超类中的方法,然后调用子类中定义的特定方法的思想是一种非常常见和强大的组织方式,可以避免重复代码。
中心点定位
还有规范中的另一部分我们还没有解决:中心点属性。
方便的是,我们的Circle类已经实现了这一点,因为我们在类定义中存储了中心点!但是我们需要确保为Rectangle类也实现这个功能。
class Rectangle(Shape):
    def __init__(self, lower_left, width, height):
        self.lower_left = lower_left
        self.width = width
        self.height = height
self.center = (lower_left[0] + width / 2, lower_left[1] + height / 2)也许这是正确的做法(这完全取决于你的实现选择!)。但让我们假设一下,如果我希望允许我的形状是可变的,即我想能够更改某个Rectangle实例的lower_left。在这种情况下,我们可能会遇到一个问题,即移动lower-left角应该同时影响到center,但上面的代码并没有考虑到这一点!
在像这样存在相关值存储在实例中的情况下,避免这个问题的一种方法是将center定义为一个方法而不是属性:
class Rectangle(Shape):
    def __init__(self, lower_left, width, height):
        self.lower_left = lower_left
        self.width = width
        self.height = height

    def center(self):
return (self.lower_left[0] + self.width / 2, self.lower_left[1] + self.height / 2)这种结构将解决上面提到的问题,因为如果我们改变了r.lower_left,那么r.center()将会相应地调整!但它也有一个缺点,那就是它不再符合我们的规范。我们的规范说r.center应该是一个元组,但是使用这种代码我们需要写r.center()而不是直接访问属性。
不过Python为我们提供了一种解决方法,即通过@property装饰器。如果我们在方法的定义上方写上@property:
class Rectangle(Shape):
    def __init__(self, lower_left, width, height):
        self.lower_left = lower_left
        self.width = width
        self.height = height

    @property
    def center(self):
return (self.lower_left[0] + self.width / 2, self.lower_left[1] + self.height / 2)那么当我们使用r.center(没有圆括号)时,Python将自动调用这个方法并返回结果(因此即使我们使用动态计算的中心值,也可以满足给定的规范要求!)。
事实证明,带有@符号的这种语法比这个更通用(我们将在下一篇阅读中进一步讨论),但目前来说,将@property视为一种特殊的语法是可以的。
或许还值得一提的是,对应于设置一个值以使其具有动态效果的操作也是等效的。因此,如果我们希望能够像这样设置r.center = (2, 3),但r.center被作为@property动态计算,我们可以编写类似以下的代码,这将调整lower_left属性,以便center具有给定的值:
class Rectangle(Shape):
    def __init__(self, lower_left, width, height):
        self.lower_left = lower_left
        self.width = width
        self.height = height

    @property
    def center(self):
        return (self.lower_left[0] + self.width / 2, self.lower_left[1] + self.height / 2)

    @center.setter
    def center(self, value):
self.lower_left = (value[0] - self.width // 2, value[0] - self.height // 2)代码框架
## FRONT MATTER FOR DRAWING/SAVING IMAGES, ETC

from PIL import Image as PILImage

# some test colors
COLORS = {
    "red": (255, 0, 0),
    "white": (255, 255, 255),
    "black": (0, 0, 0),
    "green": (0, 100, 0),
    "lime": (0, 255, 0),
    "blue": (0, 0, 255),
    "cyan": (0, 255, 255),
    "yellow": (255, 230, 0),
    "purple": (179, 0, 199),
    "pink": (255, 0, 255),
    "orange": (255, 77, 0),
    "brown": (66, 52, 0),
    "grey": (152, 152, 152),
}


def new_image(width, height, fill=(240, 240, 240)):
    return {
        "height": height,
        "width": width,
        "pixels": [fill for r in range(height) for c in range(width)],
    }


def flat_index(image, x, y):
    assert 0 <= x < image["width"] and 0 <= y < image["height"]
    return (image["height"] - 1 - y) * image["width"] + x


def get_pixel(image, x, y):
    return image["pixels"][flat_index(image, x, y)]


def set_pixel(image, x, y, c):
    assert (
        isinstance(c, tuple)
        and len(c) == 3
        and all((isinstance(i, int) and 0 <= i <= 255) for i in c)
    )
    if 0 <= x < image["width"] and 0 <= y < image["height"]:
        image["pixels"][flat_index(image, x, y)] = c


def save_color_image(image, filename, mode="PNG"):
    out = PILImage.new(mode="RGB", size=(image["width"], image["height"]))
    out.putdata(image["pixels"])
    if isinstance(filename, str):
        out.save(filename)
    else:
        out.save(filename, mode)
    out.close()


## SHAPES!


class Shape:
    # All subclasses MUST implement the following:
    #
    # __contains__(self, p) returns True if point p is inside the shape
    # represented by self
    #
    # note that "(x, y) in s" for some instance of Shape
    # will be translated automatically to "s.__contains__((x, y))"
    #
    # s.center should give the (x,y) center point of the shape
    #
    # draw(self, image, color) should mutate the given image to draw the shape
    # represented by self on the given image in the given color
    #
    def __contains__(self, p):
        pass

    def draw(self, image):
        pass


class Circle(Shape):
    pass


class Rectangle(Shape):
    pass


if __name__ == "__main__":
    out_image = new_image(500, 500)

    # add code here to draw some shapes

save_color_image(out_image, "test.png")总结
我们放眼整体,看继承在实际程序中作为组织工具的应用。特别是,我们探讨了如何利用继承来减少程序中冗余代码的数量,从而使程序更加清晰和可扩展。
当你考虑将这些想法应用到自己的程序中时,许多这些想法都适合进行一定程度的事先规划。我们可以提前思考要实现哪些类,它们之间的关系,它们支持的操作等等。但有些想法可能在编写代码时突然浮现。如果发生这种情况,不要害怕返回来重构你的代码;现在稍微花点时间进行重构,通常能够在后面的调试过程中节省大量时间!随着时间的推移和更多的实践,你将能够更好地提前识别哪些结构将有效,哪些不会。
这种持续的学习和实践将使你能够更加灵活和精确地设计和构建程序,从而更有效地利用面向对象编程的强大功能。